This page contains some basic OpenCV programs that I have created during learning the base concepts and core functions of this library. They are mostly written in C++ as this is the native language of OpenCV. I am using the latest OpenCV version: 3.2. Formerly I also used C but the C++ interface is cleaner and this has the main development focus since OpenCV 2.x. I have also tried Java: there is a desktop and an Android version. The latter becomes more and more popular.

An older OpenCV project using Android and Lego NXT robot that I created years ago can be found here.

It is always hard to get OpenCV working. For the last time I have followed this tutorial to get OpenCV working on Ubuntu 16.04.

I have installed to /usr/share/opencv with the following commands (It was not the first attempt).

cmake -D CMAKE_BUILD_TYPE=Release -D CMAKE_INSTALL_PREFIX=/usr/share/opencv -D BUILD_DOCS=ON /home/rics/tmp/opencv-3.2.0
make -j7
sudo make install

After that /usr/share/opencv/include contains the header files and /usr/share/opencv/lib contains the libraries to be dynamically linked, in other words the .so files. For easier use I have configured OpenCV with pkg-config as follows.

export OPENCV_HOME=/usr/share/opencv
export PKG_CONFIG_PATH=$PKG_CONFIG_PATH:$OPENCV_HOME/lib/pkgconfig

Then pkg-config --cflags opencv and pkg-config --libs opencv is enough to determine the location of the include and the library directory of OpenCV. (In Netbeans the latter automatically causes the former.) Finally the following 3 libraries need to be linked: opencv_core, opencv_highgui, opencv_imgproc.

For using OpenCV with Java wrapper functions are created that calls C++ interface elements. This Java layer above C++ is defined in /usr/share/opencv/share/OpenCV/java, a directory that is created during OpenCV compilation. This directory contains an opencv-320.jar to be referenced from the java project when the Java classes are compiled. It means that opencv-320.jar has to be on the classpath. Moreover this directory should also be on the Java library path because it contains the libopencv_java320.so dynamic library that links Java and C++ code together.
Library path can be set like this in Linux before the first execution:

export LD_LIBRARY_PATH=/usr/share/opencv/share/OpenCV/java

or like this during program start:

java -Djava.library.path="/usr/share/opencv/share/OpenCV/java" -jar JavaOpenCVTest.jar
.

The simplest OpenCV program. Opens the chessboard.jpg in a window from the images directory using imread and imshow highgui functions and waits for a keypress. It is important to note that OpenCV has built-in garbage collection so deallocating the img object is not necessary.

#include <iostream> #include <opencv2/core.hpp> #include <opencv2/highgui.hpp> using namespace std; using namespace cv; int main(int argc, char** argv) { string filename = "./images/chessboard.jpg"; cout << "img:" << filename << endl; Mat img = imread(filename); namedWindow("Image", 1); imshow( "Image", img ); waitKey(0); return 0; }

Opening the default web camera and showing its image in a window.

#include <iostream> #include <opencv2/core.hpp> #include <opencv2/highgui.hpp> #include <opencv2/imgproc.hpp> using namespace std; using namespace cv; int main(int argc, char** argv) { VideoCapture inputVideo(0); // Open input if (!inputVideo.isOpened()) { cout << "Could not open webcam." << endl; return -1; } namedWindow("Video", 1); Mat src; for(;;) //Show the image captured in the window and repeat { inputVideo >> src; // read if (src.empty()) break; // check if at end imshow( "Video", src ); char c = (char)waitKey(10); if (c == 27) break; } cout << "Finish" << endl; return 0; }

In the following program a video is displayed in a window. The window contains a trackbar at the top.

TrackbarTest

The actual position of the trackbar is stored in g_slider_position and continuously update with setTrackbarPos. If the user moves the position then the video position is updated accordingly with the help of the onTrackbarSlide callback function.

#include <iostream> #include <opencv2/core.hpp> #include <opencv2/highgui.hpp> #include <opencv2/imgproc.hpp> using namespace std; using namespace cv; VideoCapture inputVideo; int g_slider_position = 0; void onTrackbarSlide(int pos, void *object) { inputVideo.set( CV_CAP_PROP_POS_FRAMES, pos ); } int main(int argc, char** argv) { inputVideo.open(argv[1]); // Open input if (!inputVideo.isOpened()) { cout << "Could not open video file." << endl; return -1; } int frames = (int) inputVideo.get(CV_CAP_PROP_FRAME_COUNT); cout << "frames:" << frames << endl; namedWindow("Video", 1); createTrackbar( "Position", "Video", &g_slider_position, frames, onTrackbarSlide ); Mat src; for (;;) //Show the image captured in the window and repeat { inputVideo >> src; // read if (src.empty()) break; // check if at end imshow("Video", src); setTrackbarPos("Position","Video",g_slider_position+1); char c = (char) waitKey(10); if (c == 27) break; } cout << "Finish" << endl; return 0; }

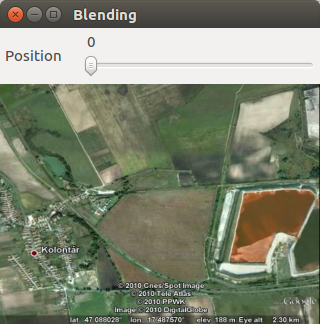
There are really powerful image manipulation methods in OpenCV. A simple, yet spectacular one is addWeighted with which two image matrices are mixed together. The weight of the components is determined by the user with a trackbar. The example is taken from here.

#include <cstdlib> #include <opencv2/core.hpp> #include <opencv2/highgui.hpp> #include <opencv2/imgproc.hpp> using namespace std; using namespace cv; #define STATES 100 int state = 0; string imagename1 = "kolontar_before.png"; string imagename2 = "kolontar_after.png"; int g_slider_position = 0; double alphaBlend = 0.0; double betaBlend = 1.0; double gammaBlend = 0.0; Mat img, img1, img2; void onTrackbarSlide(int pos, void *object) { state = pos; betaBlend = (double) pos / STATES; alphaBlend = 1 - betaBlend; addWeighted(img1, alphaBlend, img2, betaBlend, gammaBlend, img); } int main(int argc, char** argv) { namedWindow("Blending", CV_WINDOW_AUTOSIZE); img1 = imread(imagename1); img2 = imread(imagename2); resize(img1,img1,Size(640,480)); resize(img2,img2,Size(640,480)); img = img1.clone(); createTrackbar( "Position", "Blending", &g_slider_position, STATES, onTrackbarSlide ); while (1) { setTrackbarPos("Position", "Blending", state); imshow("Blending", img); char c = (char) waitKey(10); if (c == 27) break; } return 0; }
BlendingTest

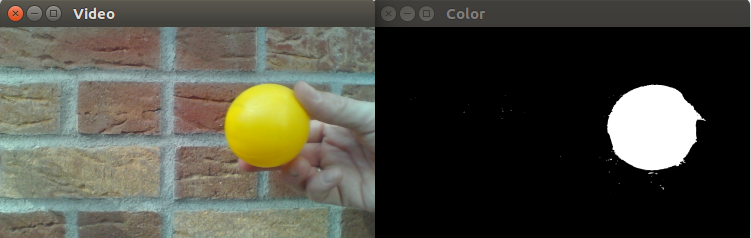
Another image processing method is thresholding with inRange function. In this case pixels falling into a selected range will marked as white, all other pixels stay black in the resulting image. This process is performed by findColor below after a conversion from RGB to HSV color space. HSV (hue-saturation-value) color space is better suited to select a certain perceived color than RGB. In the following example the selected color is yellow with hue interval (30,70) on the (0,360) scale.

#include <iostream> #include <opencv2/core.hpp> #include <opencv2/highgui.hpp> #include <opencv2/imgproc.hpp> using namespace std; using namespace cv; void findColor(const Mat image, Mat& resultImage) { // hue is between 0 and 360 Scalar lower(30/2,100,100); Scalar upper(70/2,255,255); Mat imageHSV = image.clone(); cvtColor(imageHSV, imageHSV, CV_BGR2HSV); // Converting the color space // clearing the result image resultImage = Mat::zeros(image.rows,image.cols,image.type()); inRange(imageHSV,lower,upper,resultImage); } int main(int argc, char** argv) { VideoCapture inputVideo(0); // Open input if (!inputVideo.isOpened()) { cout << "Could not open webcam." << endl; return -1; } namedWindow("Video", WINDOW_NORMAL); resizeWindow("Video",320,180); namedWindow("Color", WINDOW_NORMAL); resizeWindow("Color",320,180); Mat src; for(;;) //Show the image captured in the window and repeat { inputVideo >> src; // read if (src.empty()) break; // check if at end Mat res(src.rows,src.cols,src.type()); findColor(src, res); imshow( "Video", src ); imshow( "Color", res ); char c = (char)waitKey(10); if (c == 27) break; } cout << "Finish" << endl; return 0; }

The video capture shows the original and the thresholded frames as well.

ColorSearchTest

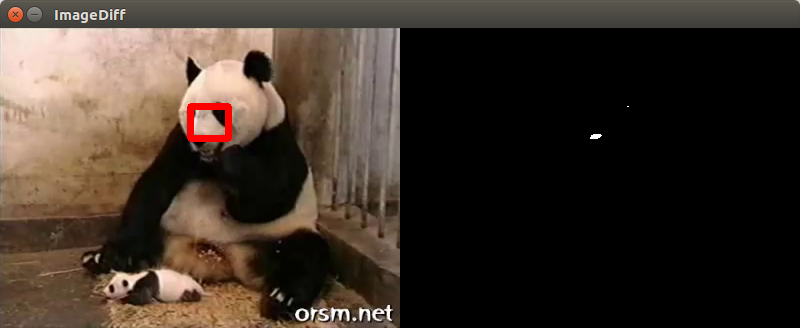
There are several ways to detect changes and track object movement with OpenCV. A simple solution is the image difference program below. First it creates a large img matrix, its left (left_img) will show the original video frames and its right (right_img) will show the changing pixels in white color.

Detection of the change is performed by diffImage. This function splits the current and the previous frame to their BGR channels, blurs them with boxFilter and then calculates the absolute difference (absDiff) pixel by pixel in each channel. The result is stored in the one-channel matrix res. Then res is further processed with the compare function. If the absolute difference is bigger than 20 then the resulting pixel will be 255.

Based on diffImage's result a bounding rectangle of the movements is calculated with calculateMovementCoordinates and rectangle is copied onto left_img. Finally res_img is copied onto each channel of the BGR right_img to get a black and white frame.

#include <iostream> #include <opencv2/core.hpp> #include <opencv2/highgui.hpp> #include <opencv2/imgproc.hpp> using namespace cv; using namespace std; void diffImage(Mat& img1, Mat& img2, Mat& res) { vector<Mat> bgr_planes1; split(img1, bgr_planes1); boxFilter(bgr_planes1[0], bgr_planes1[0], -1, Size(5, 5)); vector<Mat> bgr_planes2; split(img2, bgr_planes2); boxFilter(bgr_planes2[0], bgr_planes2[0], -1, Size(5, 5)); // comparison absdiff(bgr_planes1[0], bgr_planes2[0], res); compare(res, 20, res, CMP_GE); } void calculateMovementCoordinates( Mat diff_img, Point& upperLeft, Point& lowerRight) { upperLeft = Point(-1, -1); lowerRight = Point(-1, -1); for (int row = 0; row < diff_img.rows; ++row) { for (int col = 0; col < diff_img.cols; ++col) { if ( diff_img.at<uchar>(row,col) ) { if (upperLeft.y == -1) { upperLeft.y = row; } else { lowerRight.y = row; } if (upperLeft.x == -1 || upperLeft.x > col) { upperLeft.x = col; } else if (lowerRight.x < col) { lowerRight.x = col; } } } } } int main(int argc, char** argv) { VideoCapture inputVideo; Point upperLeft, lowerRight; namedWindow("ImageDiff", WINDOW_AUTOSIZE); inputVideo.open(argv[1]); // Open input if (!inputVideo.isOpened()) { cout << "Could not open video file." << endl; return -1; } // image sequence Mat old_img, new_img; // 1st frame inputVideo >> new_img; // read if (new_img.empty()) return -1; // check if at end old_img = new_img.clone(); Mat res_img(new_img.rows,new_img.cols,CV_8UC1); // image to show Mat img(new_img.rows,2*new_img.cols,new_img.type()); Mat left_img = img.colRange(0,new_img.cols); Mat right_img = img.colRange(new_img.cols,2*new_img.cols); while (1) { inputVideo >> new_img; // read if (new_img.empty()) break; // check if at end diffImage(old_img, new_img, res_img); calculateMovementCoordinates(res_img, upperLeft,lowerRight); new_img.copyTo(left_img); rectangle(left_img,upperLeft,lowerRight,Scalar(0,0,255),6); for (int i = 0; i < right_img.channels(); i++) { insertChannel(res_img,right_img,i); } imshow("ImageDiff", img); new_img.copyTo(old_img); char c = (char) waitKey(10); if (c == 27) break; } return 0; }
ImageDiffTest

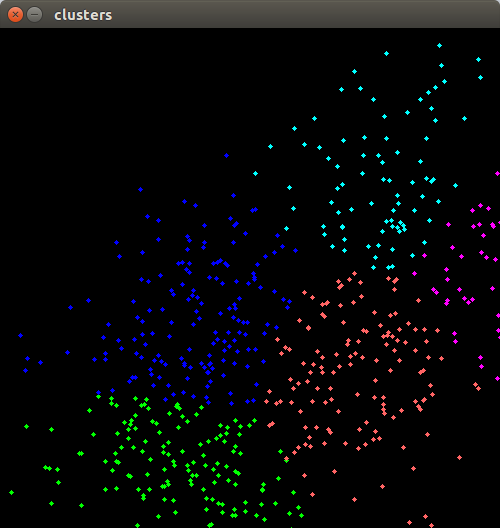
As images are represented as large matrices OpenCV is equally useful for more general matrix manipulation. The following program groups 2D points with the k-means clustering algorithm. It is based on an example found in Gary Bradski and Adrian Kaehler's Learning OpenCV: Computer Vision with the OpenCV Library book (Published by O'Reilly Media, 2008).

After generating randomly distributed points kmeans function groups them into cluster_count clusters based on their distance to each other. Points of clusters are then displayed by different color in an image.

#include <iostream> #include <opencv2/core.hpp> #include <opencv2/highgui.hpp> #include <opencv2/imgproc.hpp> using namespace std; using namespace cv; int main(int argc, char** argv) { #define MAX_CLUSTERS 5 Scalar color_tab[MAX_CLUSTERS]; Mat img(Size( 500, 500 ), CV_8UC3 ); RNG rng( 0xFFFFFFFF ); color_tab[0] = Scalar(255,0,0); color_tab[1] = Scalar(0,255,0); color_tab[2] = Scalar(100,100,255); color_tab[3] = Scalar(255,0,255); color_tab[4] = Scalar(255,255,0); namedWindow( "clusters", 1 ); for(;;) { int k, cluster_count = rng.uniform(1,MAX_CLUSTERS+1); int i, sample_count = rng.uniform(1,1000+1); Mat points( sample_count, 1, CV_32FC2 ); Mat clusters( sample_count, 1, CV_32SC1 ); /* generate random sample from multivariate Gaussian distribution */ for( k = 0; k < cluster_count; k++ ) { Point center; Mat point_chunk; center.x = rng.uniform(0,img.cols); center.y = rng.uniform(0,img.rows); point_chunk = points.rowRange(k*sample_count/cluster_count, k == cluster_count - 1 ? sample_count : (k+1)*sample_count/cluster_count); rng.fill(point_chunk, CV_RAND_NORMAL, Scalar(center.x,center.y,0,0), Scalar(img.cols/6, img.rows/6,0,0) ); } /* shuffle samples */ for( i = 0; i < sample_count/2; i++ ) { Point2f pt1 = points.at<Point2f>(rng.uniform(0,sample_count),0); Point2f pt2 = points.at<Point2f>(rng.uniform(0,sample_count),0); Point2f temp; CV_SWAP( pt1, pt2, temp ); } kmeans( points, cluster_count, clusters, TermCriteria( CV_TERMCRIT_EPS+CV_TERMCRIT_ITER, 10, 1.0 ),1,0); img = img.zeros(img.size(),img.type()); for( i = 0; i < sample_count; i++ ) { Point2f pt = points.at<Point2f>(i,0); int cluster_idx = clusters.at<int>(i,0); circle( img, pt, 2, color_tab[cluster_idx], CV_FILLED ); } imshow( "clusters", img ); char c = (char)waitKey(0); if (c == 27) break; } cout << "Finish" << endl; return 0; }
KMeansTest

OpenCV supports other languages than C++. For Java wrapper functions need to be available as described above in the Configuration. The example below only sets and reads some matrix elements, the important point is the inclusion of the native interface with static{ System.loadLibrary(Core.NATIVE_LIBRARY_NAME); }.

package javaopencvtest; import org.opencv.core.Core; import org.opencv.core.Mat; import org.opencv.core.CvType; import org.opencv.core.Scalar; class JavaOpenCVTest { static{ System.loadLibrary(Core.NATIVE_LIBRARY_NAME); } public static void main(String[] args) { System.out.println("Welcome to OpenCV " + Core.VERSION); Mat m = new Mat(5, 10, CvType.CV_8UC1, new Scalar(0)); System.out.println("OpenCV Mat: " + m); Mat mr1 = m.row(1); mr1.setTo(new Scalar(1)); Mat mc5 = m.col(5); mc5.setTo(new Scalar(5)); System.out.println("OpenCV Mat data:\n" + m.dump()); } }